

A sustainable home site evaluation starts with the land itself: observe where water flows, identify natural features, and assess whether the project aligns with the site’s environmental and social priorities. Then review access to infrastructure and nearby public spaces. A sound decision depends on how these conditions work together, not on appearance alone.
A parcel may seem practical until drainage problems, limited servicing, or a mismatch between the project and the land comes to light. These constraints matter because site decisions shape what can be built and how the home will function over time. A deliberate assessment identifies them before plans are fixed.
This guide explains how to assess drainage and stormwater, understand project eligibility, set environmental and social priorities, and review infrastructure and public spaces. It offers a clear sequence for evaluating a Canadian home site and identifying where further planning is needed. The goal is not to make every parcel work, but to find one whose conditions support the home you intend to build.
Key Takeaways
- Trace how water moves across the land, then assess whether permeable surfaces and stormwater measures can manage runoff at the site.
- Compare the project’s scale, land use and planning stage with relevant eligibility criteria before settling on a parcel.
- Set environmental and social priorities early, and assess how site conditions, infrastructure and nearby public spaces support them.
- Use The VULPIN Check as a next step when you need to assess project viability alongside the site’s constraints and goals.
Permeable paving and stormwater management
Assess the site as a connected system: water, soil, exposure, energy use, and construction access all shape a home’s performance.
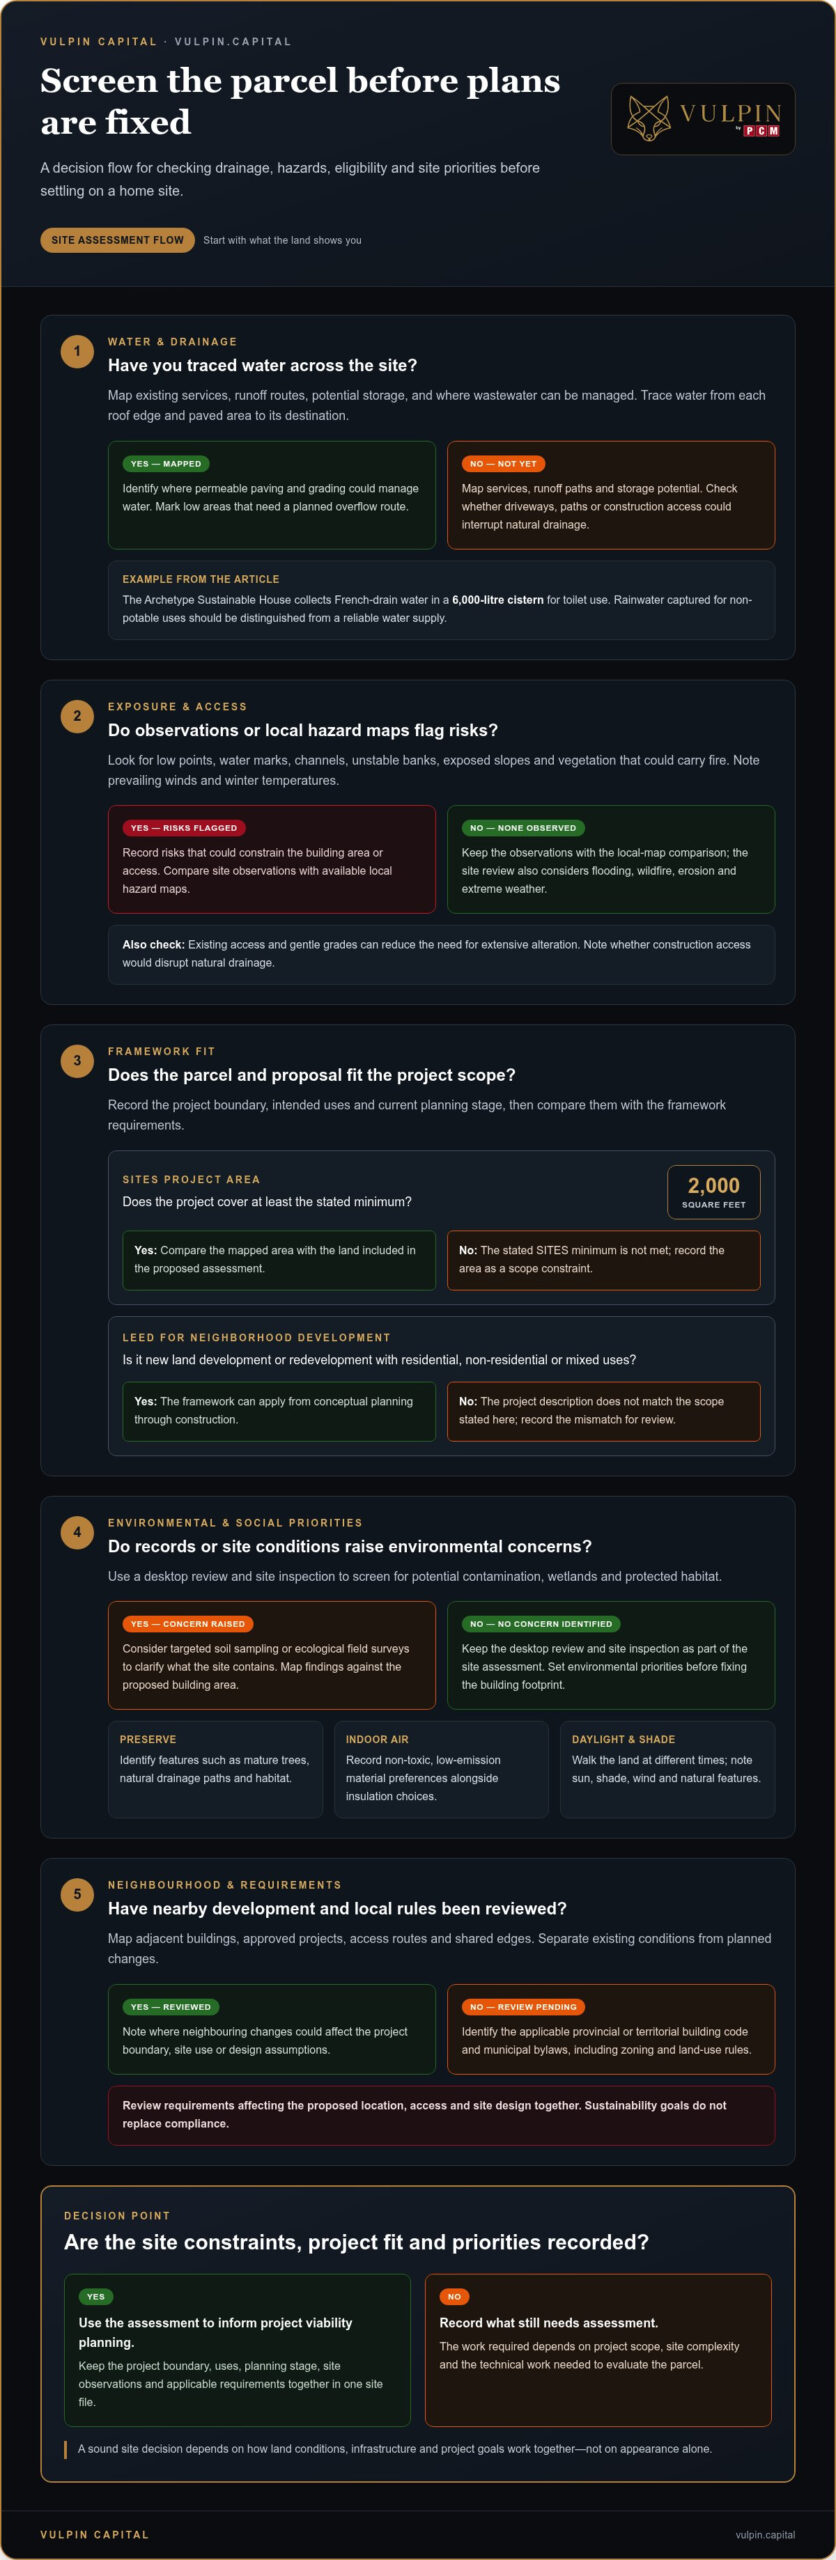
- Compare water availability, stormwater management, and wastewater options by mapping existing services, runoff routes, and potential storage. Separate reliable water supply from rainwater that can be captured for non-potable uses. The Archetype Sustainable House collects French-drain water in a 6000 litre cistern for toilet use. Record where wastewater can be managed and whether the site’s layout supports that approach.
- Review exposure to flooding, wildfire, erosion, and extreme weather through site observations. Look for low points, water marks, channels, unstable banks, exposed slopes, and vegetation that could carry fire. Note how prevailing winds and winter temperatures affect exposure. Compare your observations with available local hazard maps, then record any risks that could constrain the building area or access.
- Walk the land at different times of day and note the sun’s path, shade, wind, and natural features. Passive solar design can capture winter sunlight and provide summer shade. For example, a south-facing building area with suitable tree cover may support daylight and help reduce heating or cooling demand. Preserve landforms and vegetation that contribute to conservation.
- Trace water from each roof edge and paved area to its destination. Permeable paving allows water to pass through the surface into underlying layers, while grading directs excess runoff away from the home. Map where these measures could work and identify low areas that need a planned overflow route. Check whether driveways, paths, or construction access would interrupt natural drainage.
- Plan energy monitoring as part of the home’s design. Smart home systems can monitor energy use and adjust lighting, heating, and cooling. Connect the site’s orientation, windows, and shade to the building’s energy plan, then consider how a future rating or certification framework could document performance. Site conditions also affect construction effort: existing access and gentle grades can reduce the need for extensive alteration.
Site and land development project eligibility
Screen the parcel against the project scope, planning stage, neighbouring development, and applicable local requirements. Eligibility is not a design preference: it determines which frameworks suit the land and proposal.
- Define the project boundary and intended uses. SITES projects must cover at least 2,000 square feet. Compare the mapped area with the land included in the proposed assessment.
- Match the project type to the framework. LEED for Neighborhood Development applies to new land development or redevelopment with residential uses, non-residential uses, or a mix. It can apply from conceptual planning through construction.
- Record the project’s current stage, proposed uses, and boundary in one site file. These details help establish whether the parcel and development concept align before design work advances.
Review Neighbouring Developments
Map adjacent buildings, approved projects, access routes, and shared edges before settling the site plan. A neighbouring development, for example, may affect access or the relationship between a proposed home and the surrounding landscape. Separate existing conditions from planned changes, then note where those changes could affect the project boundary, site use, or design assumptions.
Check Applicable Codes and Bylaws
Identify the provincial or territorial building code and municipal bylaws that apply to the parcel. Requirements vary across Canada, and municipal zoning and land-use rules can determine where a home may sit and which uses a site permits. Review the provisions affecting the proposed location, access, and site design together. Sustainability goals do not replace compliance.
Assessment effort depends on the scope, site complexity, and technical work needed to evaluate the parcel. Define the questions to answer and the records required; these factors determine the work involved, not a universal fee.
Once eligibility and constraints are recorded, structured project viability planning can help connect the site decision to the development plan.
Environmental and social performance goals
Use a desktop review and site inspection to screen for potential contamination, wetlands, and protected habitat. If records or visible conditions raise concerns, targeted soil sampling or ecological field surveys can clarify what the site contains.
- Set environmental priorities before fixing the building footprint. List the site features to preserve, such as mature trees, natural drainage paths, or habitat. Compare each design decision against this list, since home design can respond to site conditions and environmental goals. This gives the project a practical basis for sustainable building choices.
- Plan soil and habitat reviews in sequence. Start with available land-use records and a site walk, then identify areas that need closer assessment. Unusual fill or staining, for example, may warrant soil sampling, while wet ground or native vegetation may call for ecological fieldwork. Tie findings to a map of the proposed building area.
- Translate indoor environmental priorities into material specifications. Non-toxic materials can help improve indoor air quality. Record preferred finishes and products, then compare them during design and procurement. For example, specify low-emission interior finishes alongside insulation choices, rather than leaving air quality until the final finishing stage.
- Coordinate daylight and temperature control through orientation, windows, and shading. Large windows can bring in natural light, while their placement and exterior shade affect heat gain and cooling needs. When mapping how residents will use each room throughout the day, compare a sunny living area with a shaded bedroom.
- Include social performance in the design brief. One in four Canadians will be over age 65 by 2045. Plan clear circulation, adaptable rooms, and usable entrances so the home can serve changing needs. Record these priorities with environmental targets; a design review can then assess both sets together.
Infrastructure and public-realm assessment
Map the services and shared spaces that will shape daily life at the site. Assess how municipal infrastructure, public access, and the home’s design and construction plan connect.
- Locate utility connections using municipal servicing plans and parcel records. Map water, wastewater, electricity, and telecommunications routes against the proposed building area. A service line crossing the preferred driveway, for example, could affect the layout. Record connection points and access constraints together so the design team can account for them before fixing the home’s position.
- Assess road access and the route from the property boundary to the home. Note road conditions, drainage structures, turning space, and how construction vehicles could reach the building area. Consider everyday trips too: a nearby transit stop or connected sidewalk can affect how residents access services. Record the actual route, not just straight-line distance on a map.
- Walk the surrounding public realm, including sidewalks, crossings, parks, and street lighting. Check whether the route to a nearby park has barriers, gaps, or unsafe crossings. Note shade trees and open spaces that could support outdoor use. These observations help distinguish an amenity that is nearby from one residents can comfortably reach on foot.
- Compare infrastructure capacity with the home’s expected operating needs. List major energy loads, water uses, and planned equipment, then identify the service connections needed to support them. A home designed for electric heating, for example, depends on suitable electrical service. Treat this review as a design input, not a detail to leave until construction documents.
- Create a site plan that layers utility records, access routes, public spaces, and design constraints. Use it to assess which infrastructure strategies are practical and how site conditions affect indoor comfort, including daylight access and exposure to street noise. Keep source documents with the plan so decisions remain traceable through design and construction.
Use project planning for site infrastructure to carry these findings into a coordinated development plan.
VULPIN Capital: The VULPIN Check
After assessing a site, use VULPIN Capital’s VULPIN Check to consider project viability. It brings the land’s constraints, development goals, and next decisions into a project-level view, helping you assess the project before advancing from site selection to a more developed plan. Drainage, servicing, access, and environmental conditions matter in relation to the specific project being considered.
For sustainable housing, FoxyHome Sustainable Housing is another relevant offering. PCMNow Project Management can support project execution. Each has a distinct role; the right next step depends on whether you’re assessing viability, pursuing a housing project, or organizing its delivery.
To discuss your project with VULPIN Capital, visit vulpin.capital.
Turn site findings into a sound project direction
A sustainable home site evaluation is most useful when its findings guide decisions beyond the initial land review. Keep a clear record of the assumptions shaping the project, including the site’s intended use and the priorities the design must meet. That record gives the next planning stage a firm reference point as details develop.
VULPIN Capital offers the VULPIN Check, PCMNow Project Management, and The Fox. These services provide a path from assessing project viability to organizing project execution. Choose the next step based on the work ahead, not pressure to move quickly. Sound development starts with disciplined decisions and a plan that can withstand scrutiny.
Contact VULPIN Capital about your site to discuss a considered next step. A well-grounded project direction is a strong place to begin.
Frequently Asked Questions
What factors should be assessed when evaluating a home site for sustainability?
Assess whether the land can support the home’s intended use, comfortable indoor conditions, and practical daily routines. Consider how residents will reach work, services, and outdoor spaces alongside the physical site conditions. Mature shade trees, for example, may improve comfort while also shaping window placement or the location of solar equipment. Record trade-offs clearly and use them to guide design priorities.
How do solar exposure, orientation, and shading affect sustainable home design in Canada?
Solar exposure and orientation influence daylight, seasonal heat gain, and reliance on heating or cooling. Passive solar design can capture sunlight in winter and provide shade in summer. Map shadows from trees and neighbouring buildings across the seasons, then position living spaces and windows to suit their use. A shaded workspace may need different daylight planning from a frequently used living room.
How can soil type, drainage, slope, and groundwater be evaluated before building?
Combine a site walk with a geotechnical investigation to understand soil, slope stability, and groundwater. Look for changes in vegetation, exposed soil, or damp areas, then map them against the proposed building location. Test pits or boreholes can reveal soil layers below the surface. Seasonal groundwater levels matter too, so use observations to inform foundation and site design rather than relying on appearance alone.
How can a site’s access to public transit, cycling, and essential services be evaluated?
Assess actual routes to transit stops, cycling connections, groceries, health services, and other daily destinations. Walk or cycle the approaches where possible, noting gaps in sidewalks, difficult crossings, steep sections, and barriers between the property and the route. A map may show a service nearby, but the usable route reveals whether residents can reach it conveniently without relying on a car for every trip.
What are the steps for conducting a sustainable residential site evaluation in Canada?
Start by defining the home’s needs and mapping the parcel. Review land conditions and local planning requirements, then document access, nearby services, and environmental priorities. Investigate unresolved site questions through appropriate technical assessments. Compare the findings with the design brief and record decisions, constraints, and outstanding actions. This sequence makes a sustainable home site evaluation a decision tool, not just a collection of observations.